导读
本文将分为两个部分:在 LAMP 环境下部署 Chevereto 图床,以及将阿里云 oss 挂载到服务器中。
本文不适用于 LNMP 环境。
本文所使用的是测试服务器,自本文发出的一个星期后该测试服务器部署的图床可能会被删除。
适用环境:
测试服务器的图床已删除
1. 环境搭建
在正式安装 Chevereto 之前,我们需要先安装如下 PHP 插件:php-curl,php-mbstring,php-mysql,php-zip
一般来说,在我们初始安装 PHP的时候,前三个插件都已经安装好了。
//通过 apt 安装:
apt install php-curl php-mbstring php-mysql php-zip
//通过 yum 安装:
yum install php-curl php-mbstring php-mysql php-zip
上述两个命令选择一个进行安装即可。
注意:如果当前登录的不是 root 账户,需要在命令前加上 sudo,或是su root来切换到 root 账户。下文提到的命令如果运行失败也按此操作。
2. 安装图床
在此之前,需要首先先明确希望图床安装的位置:
- Kira 图床 的访问路径为 img.kira.cool,kira.cool 的主站目录为
/var/www/html,Kira 图床的目录为/var/www/img(样例路径)。- 本文所用的测试服务器没有绑定域名,为了测试方便,图床的安装路径为
/var/www/html/ImageHosting,访问路径为 https://39.108.184.150/ImageHosting。- 所使用的目录对接下来的步骤没有任何影响,仅需记录好你希望安装的目录即可。
2.1. 下载 Chevereto
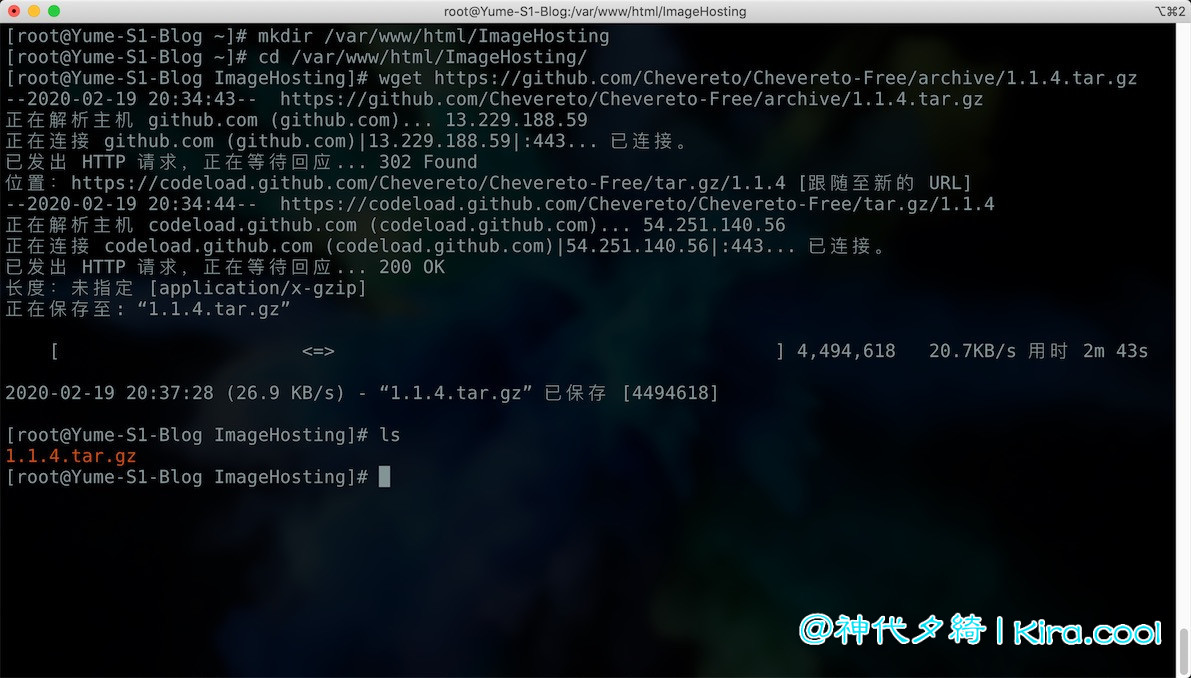
首先先切换到需要安装的目录下,然后下载 Chevereto 的安装包:
wget https://github.com/Chevereto/Chevereto-Free/archive/1.1.4.tar.gz
或是下载好后上传至服务器中。
图 2.1-1 下载 Chevereto
然后解压下载好的文件:
tar -xzvf 1.1.4.tar.gz
解压完成后,所有的文件都在名为 Chevereto-Free-1.1.4 的文件夹中,我们将文件夹中的内容移动出来:
图 2.1-2 移动 Chevereto
2.2. 异常处理
接下来打开 https://39.108.184.150/ImageHosting,然后我们会看到第一个问题:
图 2.2-1 缺少 settings.php
很简单,我们进到 app文件夹后,创建一个 settings.php 即可。
[root@test-server ImageHosting]# cd app/
[root@test-server app]# touch settings.php
回到浏览器,重新刷新页面,就会看到第二个问题: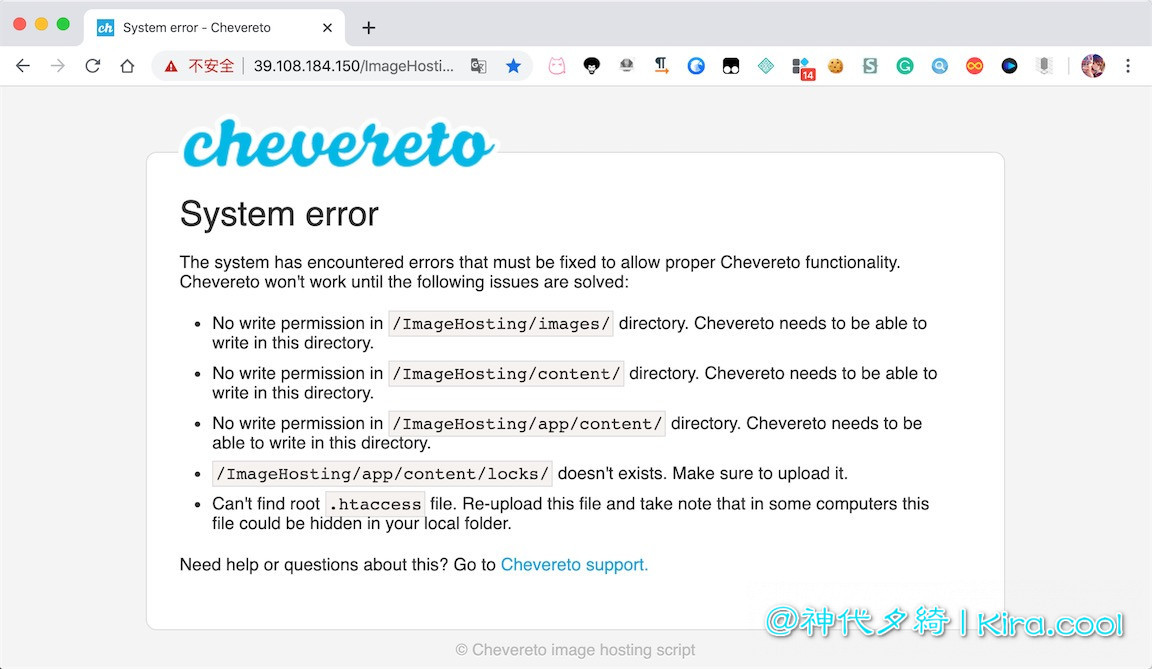
图 2.2-2 Chevereto 系统错误
看上去错误不少,我们一个个处理:
- 先调整 ImageHosting/ 目录下的文件权限:[root@test-server ImageHosting]chmod 777 -R /var/www/html/ImageHosting/*
- 在 ImageHosting/目录下创建 .htaccess文件:[root@test-server ImageHosting]# touch .htaccess
然后我们会遇到第三个问题:
图 2.2-3 找不到 install
这是因为我们还没有配置伪静态:
2.2.1. 配置伪静态
进入 .htaccess 文件,输入以下内容:
<IfModule mod_rewrite.c>
    RewriteEngine On
    # If you have problems with the rewrite rules remove the "#" from the following RewriteBase line
    # You will also have to change the path to reflect the path to your Chevereto installation
    # If you are using alias is most likely that you will need this.
    #RewriteBase /

    # 404 images
    # If you want to have your own fancy "image not found" image remove the "#" from RewriteCond and RewriteRule lines
    # Make sure to apply the correct paths to reflect your current installation
    RewriteCond %{REQUEST_FILENAME} !-f
    RewriteRule images/.+\.(gif|jpe?g|png|bmp) - [NC,L,R=404]
    #RewriteRule images/.+\.(gif|jpe?g|png|bmp) content/images/system/default/404.gif [NC,L]

    RewriteCond %{REQUEST_FILENAME} !-f
    RewriteCond %{REQUEST_FILENAME} !-d
    RewriteCond %{REQUEST_URI} !\.(css|js|html|htm|rtf|rtx|svg|svgz|txt|xsd|xsl|xml|asf|asx|wax|wmv|wmx|avi|bmp|class|divx|doc|docx|exe|gif|gz|gzip|ico|jpe?g|jpe|mdb|mid|midi|mov|qt|mp3|m4a|mp4|m4v|mpeg|mpg|mpe|mpp|odb|odc|odf|odg|odp|ods|odt|ogg|pdf|png|pot|pps|ppt|pptx|ra|ram|swf|tar|tif|tiff|wav|wma|wri|xla|xls|xlsx|xlt|xlw|zip)$ [NC]
    RewriteRule . index.php [L]
</IfModule>
然后保存退出。
也可以通过 FTP 将 .htaccess 下载到本地,修改完后再上传到服务器。
#后为注释内容,根据实际需要进行调整。
3. 配置 Chevereto
在完成上述操作后,重新刷新页面,你应该能看见以下内容: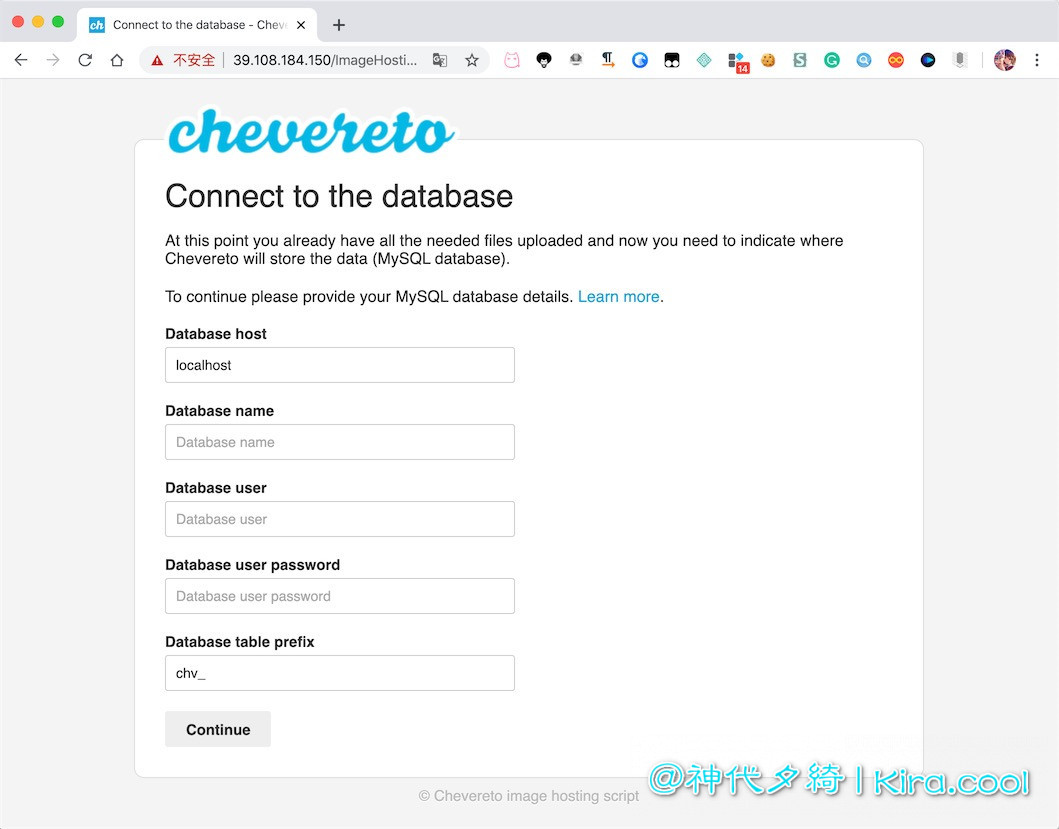
图 3-1 连接数据库
为了方便 (偷懒),本文将会直接填入 root 账户。
然后我们为 Chevereto 创建一个数据库: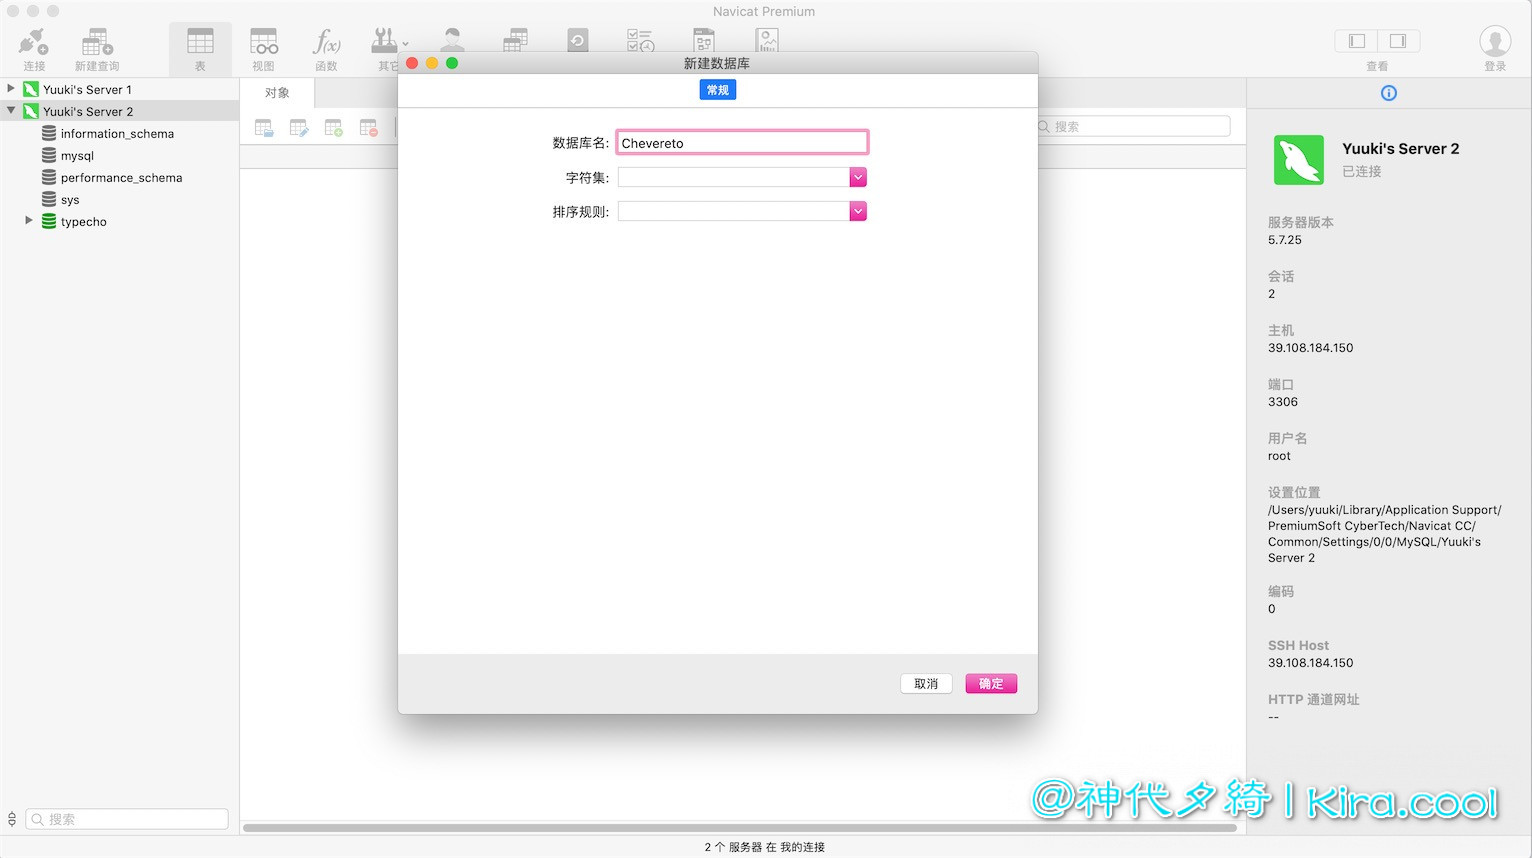
图 3-2 创建数据库
如果你单独为 Chevereto 创建了数据库账号,记得将创建的数据库授权给该账号
填写完信息后,点击 Continue 进入下一步:
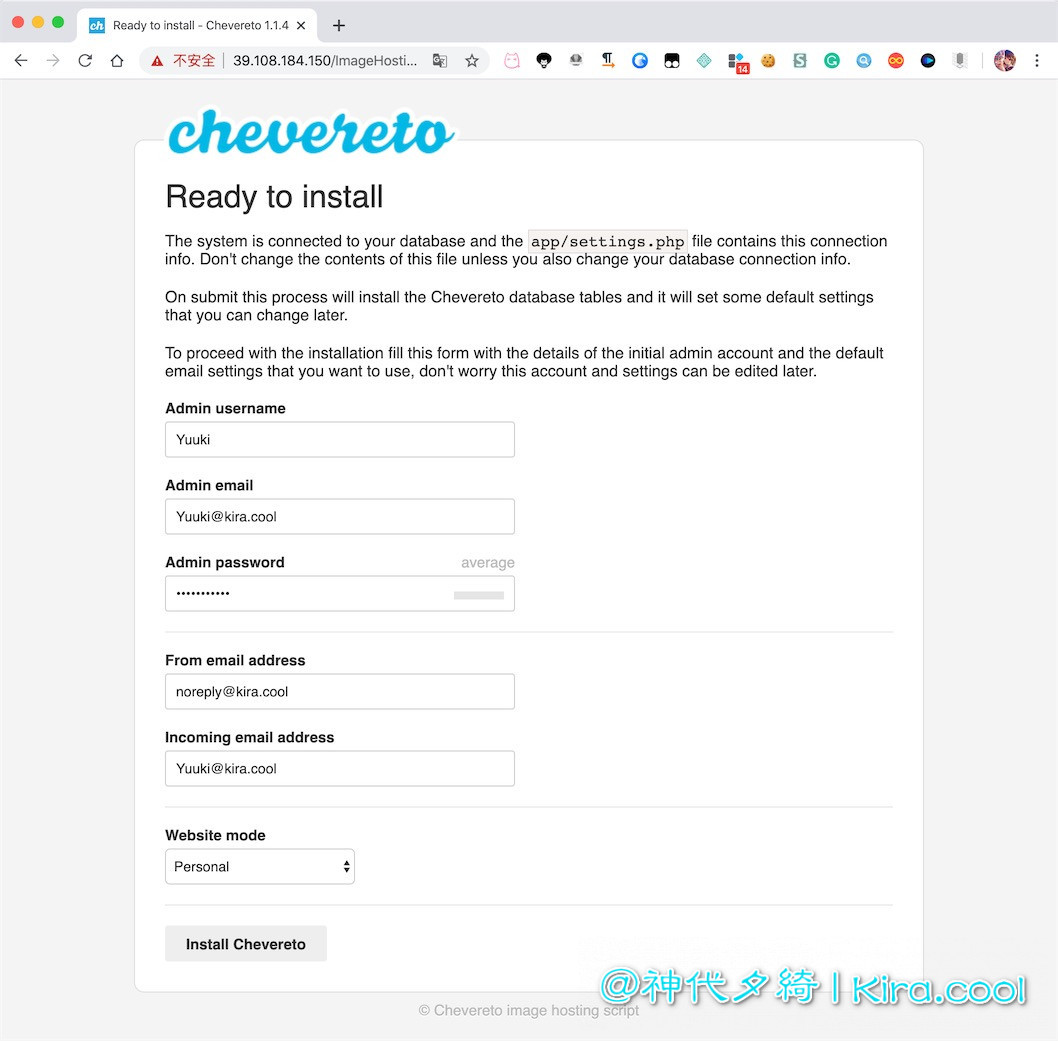
图 3-3 填写管理员信息
如果不希望其他人上传图片到你的图床,在 Website mode 处选择 Personal。
如果和我一样畏惧中文,可以在 https://39.108.184.150/ImageHosting/settings 设置中调整成中文。
至此,图床已安装完毕。
4. 连接阿里云 oss
一般来说服务器的空间都相当宝贵,为了节省空间,我们可以将图片保存在阿里云的 oss 中。为此,我们需要安装 ossfs。
ossfs 是阿里云官方出的用于将 oss 挂载在服务器上的工具。
官方地址
- 下载 ossfs[root@test-server ~]wget http://gosspublic.alicdn.com/ossfs/ossfs_1.80.6_centos7.0_x86_64.rpm
- 安装 ossfs[root@test-server ~]yum install localhost ossfs_1.80.6_centos7.0_x86_64.rpm
接下来,我们登录阿里云,创建一个Bucket: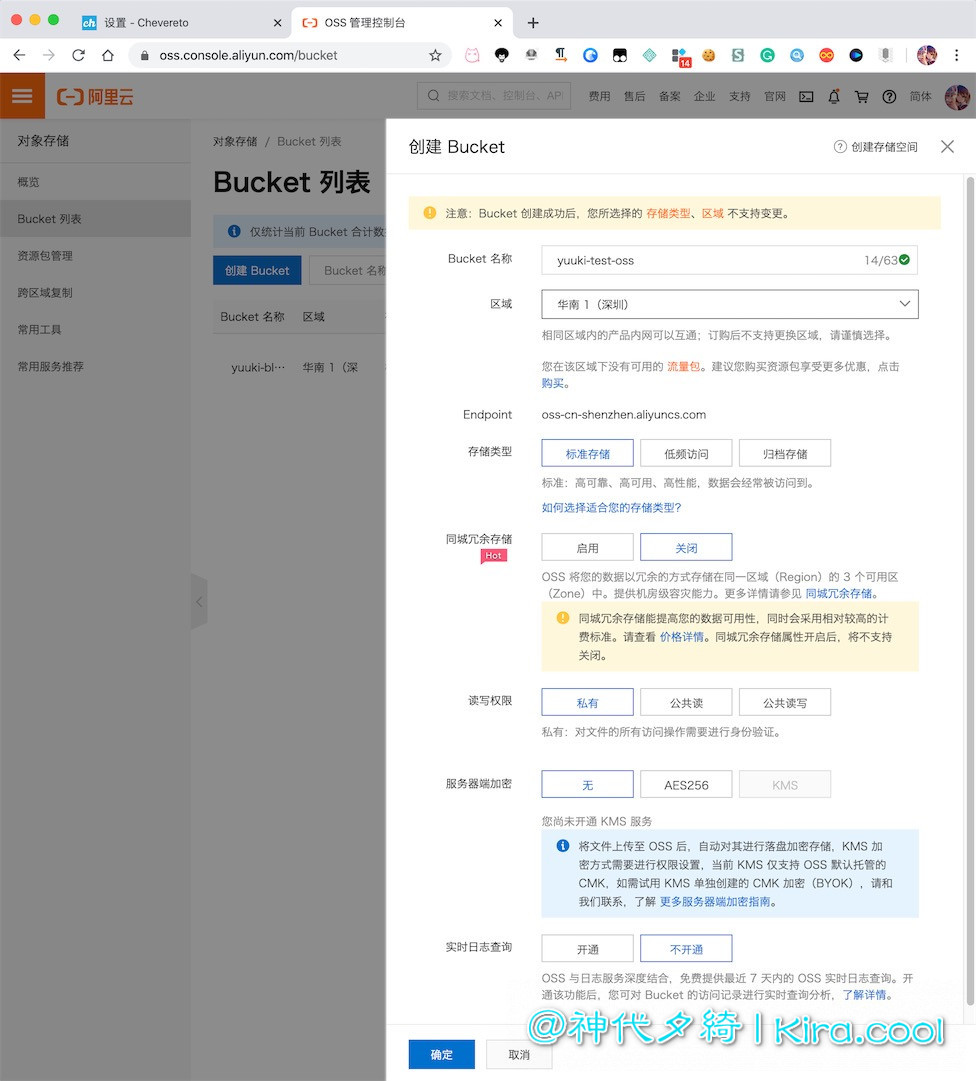
图 4-1 创建 Bucket
如果你的服务器在境外,为了保证连接速度,可以打开加速域名(额外收费):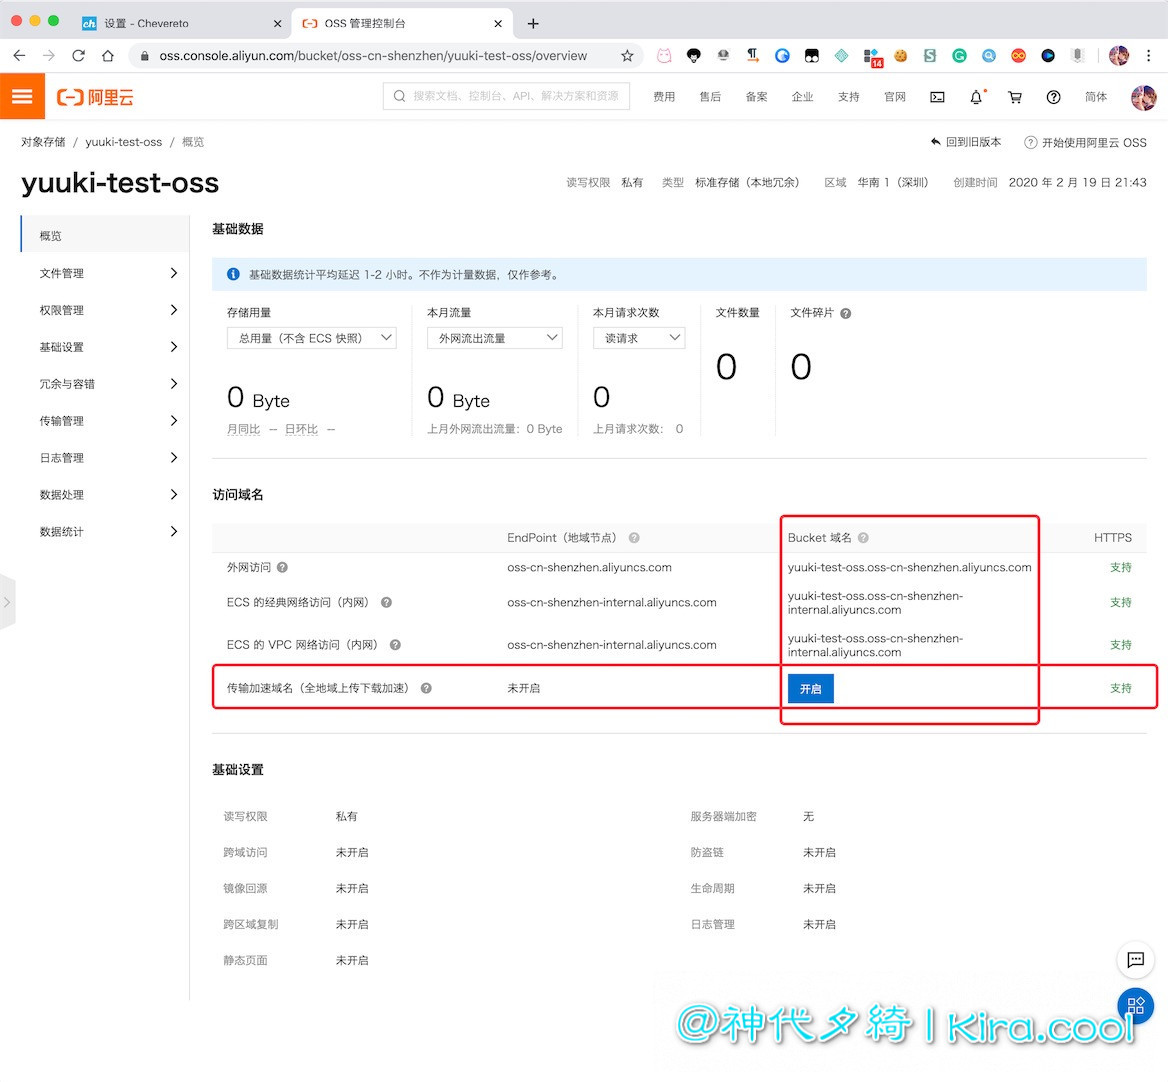
图 4-2 加速域名
接下来,需要申请 Access Key: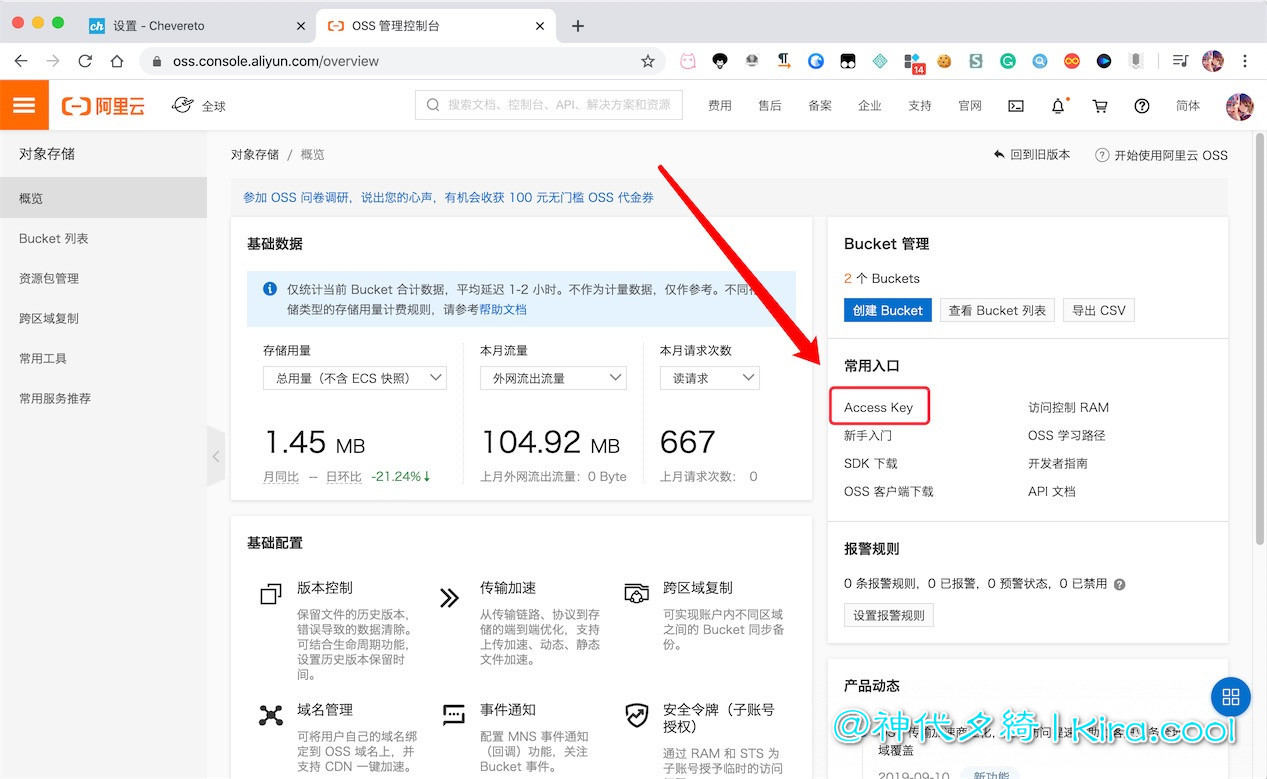
图 4-3 Access Key
按照提示操作后,你会得到AccessKeyId和AccessKeySecret,请妥善保存。
然后输入如下命令:
echo 你的bucket名字:你的keyid:你的keysecret > /etc/passwd-ossfs
chmod 640 /etc/passwd-ossfs
bucket 名字即使我们刚才创建bucket 时填写的名字,本文中为
yuuki-test-oss
接着,将 oss 挂载在你的服务器中:
ossfs 你的bucket名字 挂载目录 -ourl=你的阿里云的访问网址
为了方便,建议将 oss 挂载在你的图床存放图片的目录下,例如我的是 /var/www/html/img/images。
阿里云的访问地址是 图 4-2 中的 Bucket 域名,如果开启了传输加速,则输入传输加速的域名。
至此 oss 挂载完毕。
如果需要取消挂载,则输入如下命令:
fusermount -u /var/www/html/img/images
至此,本文的全部内容就结束了,感谢你的阅读,欢迎继续阅读本站的其他文章。
版权声明:本文为原创文章,版权归 夕綺Yuuki 所有。
本文链接:https://kira.cool/note/164-Build-own-image-host-with-chevereto
本文章采用 CC BY-NC-SA 4.0 International 协议进行许可。这意味着您可以自由的复制、转载和修改,惟须注明文章来源且禁止用于商业目的。
This article is licensed under the CC BY-NC-SA 4.0 International License, which means you are free to copy, distribute, and modify it, but must attribute the source and prohibit commercial use.


Comments NOTHING